How can I do to get mac address of the remote server?
This question came from implementation of functionality that registering a new host into the management solution. The management server needs mac address of every new server to issue UID.
I thought connecting to the remote host by ssh and run some commands.
However, Windows server is including into environment. ssh doesn't work in Windows OS.
I got an idea of using ARP(Address Resolution Protocol) from: http://windowstipoftheday.blogspot.kr/2006/02/finding-mac-address-of-remote-computer.html
1) Ping checking to find mac address (Here, I used check_ping command, one of nagios plugins)
$ /usr/lib64/nagios/plugins/check_ping -H 192.168.20.169 -w 3000.0,80% -c 5000.0,100% -p 5
PING OK - Packet loss = 0%, RTA = 1.57 ms|rta=1.574000ms;3000.000000;5000.000000;0.000000 pl=0%;80;100;0
2) If ping was succeed, run "arp -a ip"
$ arp -a 192.168.20.169 | egrep -o '([0-9a-f]{2}:){5}[0-9a-f]{2}'
00:16:3e:c3:7a:43
References:
1. http://windowstipoftheday.blogspot.kr/2006/02/finding-mac-address-of-remote-computer.html
2. http://www.grymoire.com/Unix/Regular.html
2012년 11월 26일 월요일

2012년 1월 8일 일요일
Oracle VM: Error 1011
When you add a server pool you can see the following error.
OVM 1011 OVM Manager communication with [server's IP] for operation pre-check root for server pool failed:
,'ofs2.local.cluster2'] >
=> you could see this if there is no shared storage in OVM servers. If you don't have any shared storage like SAN, you can use NFS instead. Import NFS server into OVM servsers.
1) Add the NFS to the repository using repos.py script.
/opt/ovs-agent-2.3/utils/repos.py -n source
2) Register the NFS as the primary repository.
/opt/ovs-agent-2.3/utils/repos.py -r uuid
3) Delete original local disk
/opt/ovs-agent-2.3/utils/repos.py -d uuid
# list
/opt/ovs-agent-2.3/utils/repos.py -l
# add new one
/opt/ovs-agent-2.3/utils/repos.py -n source
# delete
/opt/ovs-agent-2.3/utils/repos.py -d uuid
# register as a primary.
/opt/ovs-agent-2.3/utils/repos.py -r uuid
Oracle VM: Error - errcode=00001, errmsg=CDS accquire lock /etc/ovs-agent/db/cluster.lock
1. error message:
errcode=00001, errmsg=CDS accquire lock /etc/ovs-agent/db/cluster.lock timeout. locker process is NNNNN,
2. Solutions
is your storage repository on NFS?
And do you expirence short neworkt outage on the NFS storage maybe, before this error occurs?
You can try with the following workaround:
1) Stop all OVS-Agents: service ovs-agent stop
2) Delete the locks on the master: rm /OVS/.ovs-agent/db/*.lock
3) Start all OVS_Agents: service ovs-agent start
And do you expirence short neworkt outage on the NFS storage maybe, before this error occurs?
You can try with the following workaround:
1) Stop all OVS-Agents: service ovs-agent stop
2) Delete the locks on the master: rm /OVS/.ovs-agent/db/*.lock
3) Start all OVS_Agents: service ovs-agent start
Or
Upgrade Oracle VM Server to 2.2.2 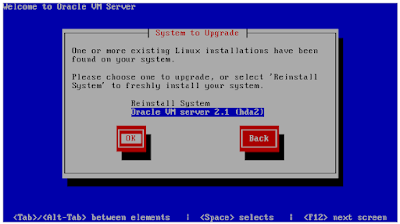

When you upgrade Oracle VM server to 2.2.2, you should select "Oracle VM Server x.x.x (hda2) to upgrade from previous version.
"Reinstall System" means newly install, not upgrade.
"Reinstall System" means newly install, not upgrade.
3. Useful link
Recommend to upgrade to 2.2.2 from https://forums.oracle.com/forums/thread.jspa?threadID=2270155
2011년 12월 22일 목요일
Hadoop: CHD installation on CentOS (multi nodes)
I'm going to explain how to install Cloudera's hadoop known as CHD (Cloudera Hadoop Distribution) on CentOS.
I prepared a physical server for this installation. I installed CentOS 5.6 and xen hypervisor which meant configured to use five VMs for all hadoop nodes.

In my case, there were a master namenode, a secondary namenode and three datanodes. I allocated 1GB of RAM and 100GB storage for each. I didn't consider its performance factor in the environment, because I had a priority on better understand how it worked.
1. Add cloudera repository file in /etc/yum.repos.d/ directory.
If don't have any cloudera repo file there, you can create new file. for example, you create a file named "cloudera-cdh3.repo" and save following lines in it.
Now, you can search and install hadoop packages via yum
$ yum search hadoop-0.20
$ yum install hadoop-0.20
2. Install components
hadoop install file is composed of several demon types.
You can execute yum like below:
$ yum install hadoop-0.20-<demon type>
* Before start installation, it'd good to create a user who control hadoop for the security reason. I made a user named "huser" to give privileges of the job related to hadoop.
# Add a user
$ useradd huser
# Allows members of "huser" group to run superuser command.
$ vi /etc/sudoers
%huser ALL=(ALL) NOPASSWD: ALL
# Check /etc/hosts, (Never edit the first line.)
127.0.0.1 localhost.localdomain localhost
XXX.XXX.XXX.171 name01.hadoop.com name01
XXX.XXX.XXX.172 name02.hadoop.com name02
XXX.XXX.XXX.173 node01.hadoop.com node01
XXX.XXX.XXX.174 node02.hadoop.com node02
XXX.XXX.XXX.175 node03.hadoop.com node03
# Generate SSH key on master node and slave nodes
$ ssh-keygen -t rsa
generating public/private rsa key pair.
Enter file in which to save the key (~/.ssh/id_rsa):
Creating directory '~/.ssh'.
Enter passphrase (empty for no passphrase):
Enter same passphrase again:
Your public key has been saved in ~/.ssh/id_rsa.pub.
The key fingerprint is:
$ cp ~/.ssh/id_rsa.pub ~/.ssh/authorized_keys
# Copy SSH key of master node to all salves (here, it incluses secondary namenode and datanodes)
$ scp ~/.ssh/id_rsa.pub:/.ssh/authorized_keys
2.1) On the namenode:
$ sudo yum install hadoop-0.20
$ sudo yum install hadoop-0.20-namenode
$ sudo yum install hadoop-0.20-jobtracker
2.2) On the datanode:
$ sudo yum install hadoop-0.20
$ sudo yum install hadoop-0.20-datanode
$ sudo yum install hadoop-0.20-tasktracker
2.3) On the secondarynamenode
$ yum install hadoop-0.20
Originally, Although I had to install secondarynamenode deamon on this node, it worked well without installing this module.
After installation, directories are followings:
$ sudo chown -R huser:huser /usr/lib/hadoop-0.20
$ sudo chown -R huser:huser /etc/hadoop-0.20/conf
$ sudo chown -R huser:huser /var/log/hadoop-0.20
$ sudo chown -R huser:huser /var/run/hadoop-0.20
It should create hadoop directory for hdfs and MapReduce
$ mkdir /hadoop
3. Hadoop configuration
Go to the directory /usr/lib/hadoop-0.20/conf and modify config files of haoop.
3.1) hadoop-env.sh
export JAVA_HOME=/usr/java/jdk1.6.0_29
export HADOOP_HOME=/usr/lib/hadoop-0.20
export HADOOP_LOG_DIR=${HADOOP_HOME}/logs
export HADOOP_SLAVES=${HADOOP_HOME}/conf/slaves
export HADOOP_PID_DIR=${HADOOP_HOME}/pids
3.2) core-site.xml
<property>
<name>fs.default.name</name>
<value>hdfs://name01.hadoop.com:9000</value>
</property>
<property>
<name>hadoop.tmp.dir</name>
<value>/hadoop/tmp</value>
</property>
3.3) hdfs-site.xml
<property>
<name>dfs.name.dir</name>
<value>/hadoop/dfs/name</value>
</property>
<property>
<name>dfs.replication</name>
<value>3</value>
</property>
3.4) mapred-site.xml
<property>
<name>mapred.job.tracker</name>
<value>name01.hadoop.com:9001</value>
</property>
<property>
<name>mapred.local.dir</name>
<value>/hadoop/mapred/local</value>
</property>
</property>
<name>mapred.system.dir</name>
<value>/hadoop/mapred/system</value>
</property>
3.5) slaves
node01
node02
node03
3.6) masters
name02
4. Format namenode
$hadoop namenode --format
5. Start hadoop on the master namenode
Go to /usr/lib/hadoop-0.20/bin and then execute ./start-all.sh
$ ./start-all.sh
starting namenode, logging to .....
node01: starting datanode, logging to ......
node03: starting datanode, logging to ......
node02: starting datanode, logging to ......
name02: starting secondarynamenode, logging to .....
starting jobtracker, logging to .....
node01: starting tasktracker, logging to ....
node02: starting tasktracker, logging to ....
node03: starting tasktracker, logging to ....
# View MapReduce job on the web browser
http://<ip address>:50030
# View HDFS on the web browser
http://<ip address>:50070
I prepared a physical server for this installation. I installed CentOS 5.6 and xen hypervisor which meant configured to use five VMs for all hadoop nodes.

In my case, there were a master namenode, a secondary namenode and three datanodes. I allocated 1GB of RAM and 100GB storage for each. I didn't consider its performance factor in the environment, because I had a priority on better understand how it worked.
1. Add cloudera repository file in /etc/yum.repos.d/ directory.
If don't have any cloudera repo file there, you can create new file. for example, you create a file named "cloudera-cdh3.repo" and save following lines in it.
[cloudera-cdh3]
name=Cloudera's Distribution for Hadoop, Version 3
mirrorlist=http://archive.cloudera.com/redhat/cdh/3/mirrors
gpgkey = http://archive.cloudera.com/redhat/cdh/RPM-GPG-KEY-cloudera
gpgcheck = 1
Now, you can search and install hadoop packages via yum
$ yum search hadoop-0.20
$ yum install hadoop-0.20
2. Install components
hadoop install file is composed of several demon types.
- namenode
- datanode
- secondarynamenode
- jobtracker
- tasktraker
You can execute yum like below:
$ yum install hadoop-0.20-<demon type>
* Before start installation, it'd good to create a user who control hadoop for the security reason. I made a user named "huser" to give privileges of the job related to hadoop.
# Add a user
$ useradd huser
# Allows members of "huser" group to run superuser command.
$ vi /etc/sudoers
%huser ALL=(ALL) NOPASSWD: ALL
# Check /etc/hosts, (Never edit the first line.)
127.0.0.1 localhost.localdomain localhost
XXX.XXX.XXX.171 name01.hadoop.com name01
XXX.XXX.XXX.172 name02.hadoop.com name02
XXX.XXX.XXX.173 node01.hadoop.com node01
XXX.XXX.XXX.174 node02.hadoop.com node02
XXX.XXX.XXX.175 node03.hadoop.com node03
# Generate SSH key on master node and slave nodes
$ ssh-keygen -t rsa
generating public/private rsa key pair.
Enter file in which to save the key (~/.ssh/id_rsa):
Creating directory '~/.ssh'.
Enter passphrase (empty for no passphrase):
Enter same passphrase again:
Your public key has been saved in ~/.ssh/id_rsa.pub.
The key fingerprint is:
$ cp ~/.ssh/id_rsa.pub ~/.ssh/authorized_keys
# Copy SSH key of master node to all salves (here, it incluses secondary namenode and datanodes)
$ scp ~/.ssh/id_rsa.pub
2.1) On the namenode:
$ sudo yum install hadoop-0.20
$ sudo yum install hadoop-0.20-namenode
$ sudo yum install hadoop-0.20-jobtracker
2.2) On the datanode:
$ sudo yum install hadoop-0.20
$ sudo yum install hadoop-0.20-datanode
$ sudo yum install hadoop-0.20-tasktracker
2.3) On the secondarynamenode
$ yum install hadoop-0.20
Originally, Although I had to install secondarynamenode deamon on this node, it worked well without installing this module.
After installation, directories are followings:
- Hadoop home: /usr/lib/hadoop-0.20
- JDK home: /usr/java/jdk1.6.0_29
$ sudo chown -R huser:huser /usr/lib/hadoop-0.20
$ sudo chown -R huser:huser /etc/hadoop-0.20/conf
$ sudo chown -R huser:huser /var/log/hadoop-0.20
$ sudo chown -R huser:huser /var/run/hadoop-0.20
It should create hadoop directory for hdfs and MapReduce
$ mkdir /hadoop
3. Hadoop configuration
Go to the directory /usr/lib/hadoop-0.20/conf and modify config files of haoop.
3.1) hadoop-env.sh
export JAVA_HOME=/usr/java/jdk1.6.0_29
export HADOOP_HOME=/usr/lib/hadoop-0.20
export HADOOP_LOG_DIR=${HADOOP_HOME}/logs
export HADOOP_SLAVES=${HADOOP_HOME}/conf/slaves
export HADOOP_PID_DIR=${HADOOP_HOME}/pids
3.2) core-site.xml
<property>
<name>fs.default.name</name>
<value>hdfs://name01.hadoop.com:9000</value>
</property>
<property>
<name>hadoop.tmp.dir</name>
<value>/hadoop/tmp</value>
</property>
3.3) hdfs-site.xml
<property>
<name>dfs.name.dir</name>
<value>/hadoop/dfs/name</value>
</property>
<property>
<name>dfs.replication</name>
<value>3</value>
</property>
3.4) mapred-site.xml
<property>
<name>mapred.job.tracker</name>
<value>name01.hadoop.com:9001</value>
</property>
<property>
<name>mapred.local.dir</name>
<value>/hadoop/mapred/local</value>
</property>
</property>
<name>mapred.system.dir</name>
<value>/hadoop/mapred/system</value>
</property>
3.5) slaves
node01
node02
node03
3.6) masters
name02
4. Format namenode
$hadoop namenode --format
5. Start hadoop on the master namenode
Go to /usr/lib/hadoop-0.20/bin and then execute ./start-all.sh
$ ./start-all.sh
starting namenode, logging to .....
node01: starting datanode, logging to ......
node03: starting datanode, logging to ......
node02: starting datanode, logging to ......
name02: starting secondarynamenode, logging to .....
starting jobtracker, logging to .....
node01: starting tasktracker, logging to ....
node02: starting tasktracker, logging to ....
node03: starting tasktracker, logging to ....
# View MapReduce job on the web browser
http://<ip address>:50030
# View HDFS on the web browser
http://<ip address>:50070
2011년 6월 10일 금요일
SCOM: How to monitoring Linux script file - part 2
As follow-up of the post about how to monitoring linux script file, I'll explain that creating configurable monitor type and recovery type which mean reusable by many similar monitors.
The previous post, It wasn't able to reuse the monitor type, because I wrote a certain command and file path in Module types (Monitor type and write action).
Looking at Module type, each module has "configuration schema" tab. MP authors can define configuration values in configuration schema tab to pass the values to the later step.

Figure 1. Configuration schema tab.
This time, I assume that I'd like to make one monitor type and to create some monitors which monitoring different script files. Changeable properties are related to the script, in other words, a script command and file path for SFTP.
Step 1. Add configuration for Monitor type.
As first step, I added a configuration named "ShellCommand".

Figure 2. Configuration schema tab of the Monitor type
Go to Member Module tab and click Edit button.

Figure 3. Member modules tab of the Monitor type
In the ShellCommand field, type "$Config/ShellCommand$". this value is then added value in Configuration Schema tab.

Figure 4. Configuration window of Member modules tab
Step 2. Add configuration for Recovery Action.
The second step, it is similar to the first step, is modifying recovery action.
I add two configurations, "Source" is the field which contains full path of the source file on Windows and "Target" is the full path of target on Linux.

Figure 5. Configuration schema tab of the Recovery action
Then, I mapped above two values to correspond fields.

Figure 6. Configuration window of the Recovery action
Step 3. Create a monitor.
After earlier two steps, I was creating a monitor from the monitor type.

Figure 7. Create a Monitor
Go to the configuration tab.
I have to set the shell command that I want to execute.

Figure 8. Configuration tab of the Monitor
This is the point which is different from previous post. As I put the new command whenever I define a new monitor, I can easily create the different monitor from the same monitor type.
Go to the Diagnose and Recovery tab. and I added a Recovery action.
Click Edit button.

Figure 9. Action pane of the Diagnose and Recovery window
Put the right paths for those field.

Figure 10. Configuration for recovery action
The previous post, It wasn't able to reuse the monitor type, because I wrote a certain command and file path in Module types (Monitor type and write action).
Looking at Module type, each module has "configuration schema" tab. MP authors can define configuration values in configuration schema tab to pass the values to the later step.

Figure 1. Configuration schema tab.
This time, I assume that I'd like to make one monitor type and to create some monitors which monitoring different script files. Changeable properties are related to the script, in other words, a script command and file path for SFTP.
Step 1. Add configuration for Monitor type.
As first step, I added a configuration named "ShellCommand".

Figure 2. Configuration schema tab of the Monitor type
Go to Member Module tab and click Edit button.

Figure 3. Member modules tab of the Monitor type
In the ShellCommand field, type "$Config/ShellCommand$". this value is then added value in Configuration Schema tab.

Figure 4. Configuration window of Member modules tab
Step 2. Add configuration for Recovery Action.
The second step, it is similar to the first step, is modifying recovery action.
I add two configurations, "Source" is the field which contains full path of the source file on Windows and "Target" is the full path of target on Linux.

Figure 5. Configuration schema tab of the Recovery action
Then, I mapped above two values to correspond fields.

Figure 6. Configuration window of the Recovery action
Step 3. Create a monitor.
After earlier two steps, I was creating a monitor from the monitor type.

Figure 7. Create a Monitor
Go to the configuration tab.
I have to set the shell command that I want to execute.

Figure 8. Configuration tab of the Monitor
This is the point which is different from previous post. As I put the new command whenever I define a new monitor, I can easily create the different monitor from the same monitor type.
Go to the Diagnose and Recovery tab. and I added a Recovery action.
Click Edit button.

Figure 9. Action pane of the Diagnose and Recovery window
Put the right paths for those field.

Figure 10. Configuration for recovery action
2011년 6월 9일 목요일
SCOM: Does Linux need to join in AD?
Windows computers must join in active directory to be managed by SCOM. So, what if Linux computer? Do administrators have to make Linux join in AD before SCOM agent installation on each computer?
At first, I had manual procedures of AD joining for Linux computers, setting time synchronization, authentication configuration and modify samba service. After complete these configurations, it just worked. In other words, the discovery wizard of SCOM found those machine well.
I tried to do this another way. I made up it without AD joining.
I created a VM running CentOS. I was setting hostname("centomtest") and a static internal IP("10.1.1.121"). after that, I tried to discovered this VM via the Wizard. But it failed.

Figure 1. Discovery wizard: Fail to resolve machine
And I manually registered the static IP address to DNS server. AD and DNS were combined in one server. I only registered it only the DNS server not AD.

Figure 2. Add a new host in DNS server.
This time, It worked from the discovery wizard.

Figure 3. Discovery wizard: Linux server was found successfully
As a result, Linux computers don't need AD joining. They just need to be registered in DNS server.
However, what would happen if the IP address change?
SCOM will produce an error. It would be about Heart failure.
Administrator manually needs to change the record in DNS server.

Figure 4. When IP address of the Linux server is changed , SCOM shows an error. It fails to communicate to the server.
At first, I had manual procedures of AD joining for Linux computers, setting time synchronization, authentication configuration and modify samba service. After complete these configurations, it just worked. In other words, the discovery wizard of SCOM found those machine well.
I tried to do this another way. I made up it without AD joining.
I created a VM running CentOS. I was setting hostname("centomtest") and a static internal IP("10.1.1.121"). after that, I tried to discovered this VM via the Wizard. But it failed.

Figure 1. Discovery wizard: Fail to resolve machine
And I manually registered the static IP address to DNS server. AD and DNS were combined in one server. I only registered it only the DNS server not AD.

Figure 2. Add a new host in DNS server.
This time, It worked from the discovery wizard.

Figure 3. Discovery wizard: Linux server was found successfully
As a result, Linux computers don't need AD joining. They just need to be registered in DNS server.
However, what would happen if the IP address change?
SCOM will produce an error. It would be about Heart failure.
Administrator manually needs to change the record in DNS server.

Figure 4. When IP address of the Linux server is changed , SCOM shows an error. It fails to communicate to the server.
2011년 5월 31일 화요일
SCOM: Invoke command via WinRM
After SCOM agent installation, It opens the way to communicate to Linux server directly. SCOM agent use WinRM to interact between management server and managed hosts.
Using WinRM, it is able to invoke command or get information. I write two examples. The first is executing a script on Linux and the other is getting performance information on the same server.
Command 1 : Execute command
c:\>winrm invoke ExecuteShellCommand http://schemas.microsoft.com/wbem/wscim/1/cim-schema/2/SCX_OperatingSystem?__cimnamespace=root/scx -r:https://[server name]:1270/wsman -u:[user id] -p:[password] -auth:basic -skipcacheck -encoding:utf-8 -skiprevocationcheck -file:c:\file.xml

file.xml:

Command 2 : Getting information
PS C:\> winrm enumerate http://schemas.microsoft.com/wbem/wscim/1/cim-schema/2/SCX_ProcessorStatisticalInformation?__cimnamespace=root/scx -r:https://[server name]:1270/wsman -u:[user id] -p:[password] -auth:basic -skipcacheck -encoding:utf-8 -skiprevocationcheck

Please refer to this site for more information about Microsoft Cross-Platform Providers (XPlatProviders): http://scx.codeplex.com/wikipage?title=xplatproviders
Using WinRM, it is able to invoke command or get information. I write two examples. The first is executing a script on Linux and the other is getting performance information on the same server.
Command 1 : Execute command
c:\>winrm invoke ExecuteShellCommand http://schemas.microsoft.com/wbem/wscim/1/cim-schema/2/SCX_OperatingSystem?__cimnamespace=root/scx -r:https://[server name]:1270/wsman -u:[user id] -p:[password] -auth:basic -skipcacheck -encoding:utf-8 -skiprevocationcheck -file:c:\file.xml

file.xml:

Command 2 : Getting information
PS C:\> winrm enumerate http://schemas.microsoft.com/wbem/wscim/1/cim-schema/2/SCX_ProcessorStatisticalInformation?__cimnamespace=root/scx -r:https://[server name]:1270/wsman -u:[user id] -p:[password] -auth:basic -skipcacheck -encoding:utf-8 -skiprevocationcheck

Please refer to this site for more information about Microsoft Cross-Platform Providers (XPlatProviders): http://scx.codeplex.com/wikipage?title=xplatproviders
2011년 5월 28일 토요일
SCOM: How to monitoring Linux script file
I authored MP (Management Pack) to get performance data about network usage on Linux servers. That was a way that I wrote a script file and make the rule to execute that script on every certain minutes.
This time, I had a plan to add a feature of automatic copying the script to Linux machines when needed, regardless of manual works.
My intention were follows:
1) Check the existence the script.
2) If not, Copy the script to desired location.
3) After copy, It gives privilege to the script.
My intention was to checking if the file was existed. I thought I would make the rule for the first time, but I changed to make a monitor. It should be a monitor because this has feature to check something periodically. The second one was that I found that It enabled to transfer file via SFTP (SSH File Transfer Protocol). The first and third, they were able to invoke through WSMan. In addition, If file was already been there, the second and third were ignored.
Of course, I had to set some properties to achieve this goal throughout MP.
I used SCOM Authoring console.
First step, Make a data source for Monitor type
I made an user-defined data source: A scheduler and an Invoke were added to the data source named


Define Monitor state. In my case, I intended that I was mapping success ID to find the script, on the other hand, was mapping warning ID when it didn't find.

Define at least one more member modules. I defined three modules. First module, DS(Data source), was to invoke Linux command. And the rests are Condition Detections, Found was for when script file would be found and NotFound was for when file didn't find.

In terms of DS, this came from a type name CloudPortal.Linux.Monitoring.DataSource.ShellCommand.Monitoring.
Let's look at DS module closely, Linux command that I'd like to invoke is

And then this capture is Find module, set 1 as its value which means the script file exists. The way to get the output of DS execution is through //*[local-name()="StdOut"]

On the contrary, the value set as 0 in NotFound module.
The next was mapping states to the modules. Previously, I defined two states (Success and Warning). Here, One or more specific modules have to belong to a specific state and the order.

In the case of Success, it included DS and Found, Found was followed by DS.
Third step, Make a unit monitor
Once the monitor type has successfully been made, It only remains to define unit monitor.
Go to Health monitor -> Monitors -> New.

It doesn't need to make a class in advance to create monitor ( There is example of creating a class for its monitor on the first reference site), just needed to define target.
I defined Microsoft.Linux.Computer as target and System.Health.AvailabilityState as parent monitor.
Then, clicked "Browser for a type" in Configuration tab and chose the monitor type that I defined earlier.

The last, defined recovery tasks in diagnostic and recovery tab.

I created three tasks when health status appear warning.
As knowing easily the meaning from their names, these are about making directory (/MGR), copying file and give privilege to the file.


This is information of my write action called SFTP.

Let's only focus on file transfer among three steps (Invoke, SFTP and Invoke2).
After you add a write action named Microsoft.Unix.SFTPTransfer.WriteAction, you need to fill its properties of Host, UserName, Password, SourceFile, TargetFile. The point is that the file is transfered from Windows to Linux via SFTP.
I think that values of Host, Username and password are the the same with the above image.
- Host: $Target/Property[Type="Unix!Microsoft.Unix.Computer"]/PrincipalName$
- UserName: $RunAs[Name="Unix!Microsoft.Unix.ActionAccount"]/UserName$
- Password: $RunAs[Name="Unix!Microsoft.Unix.ActionAccount"]/Password$
However, Sourcefile and Targetfile may be difference with your cases.
SourceFile should be a file located in SCOM management server.
In my case, I created a folder named LinuxScripts on C: drive on SCOM management server and then I located my file(network_usage.py) into the folder. And the last property, TargetFile is the linux directory which you want to copy to.
Reference sites:
1. This is second to none site, this is good guide about authoring MP: http://operatingquadrant.com/2011/03/23/operations-manager-extending-unixlinux-monitoring-with-mp-authoring-part-i/
2. The contents of this site includes lots of XML tags, but it gives you analytical way of which part of your MP is wrong when the monitor doesn't work: http://technet.microsoft.com/en-us/library/dd789006.aspx
This time, I had a plan to add a feature of automatic copying the script to Linux machines when needed, regardless of manual works.
My intention were follows:
1) Check the existence the script.
2) If not, Copy the script to desired location.
3) After copy, It gives privilege to the script.
My intention was to checking if the file was existed. I thought I would make the rule for the first time, but I changed to make a monitor. It should be a monitor because this has feature to check something periodically. The second one was that I found that It enabled to transfer file via SFTP (SSH File Transfer Protocol). The first and third, they were able to invoke through WSMan. In addition, If file was already been there, the second and third were ignored.
Of course, I had to set some properties to achieve this goal throughout MP.
I used SCOM Authoring console.
First step, Make a data source for Monitor type
I made an user-defined data source: A scheduler and an Invoke were added to the data source named
CloudPortal.Linux.Monitoring.DataSource.ShellCommand.Monitoring. This will be going to be used to define a Monitor type.

Second step, Make a monitor Type
Create a monitor type. Go to Type Library -> Monitor Type -> New.
Define Monitor state. In my case, I intended that I was mapping success ID to find the script, on the other hand, was mapping warning ID when it didn't find.

Define at least one more member modules. I defined three modules. First module, DS(Data source), was to invoke Linux command. And the rests are Condition Detections, Found was for when script file would be found and NotFound was for when file didn't find.

In terms of DS, this came from a type name CloudPortal.Linux.Monitoring.DataSource.ShellCommand.Monitoring.
Let's look at DS module closely, Linux command that I'd like to invoke is
ls /MGR/network_usage.py | wc -l
This returns 1 when it finds "network_usage.py" and 0 when it doesn't.

And then this capture is Find module, set 1 as its value which means the script file exists. The way to get the output of DS execution is through //*[local-name()="StdOut"]

On the contrary, the value set as 0 in NotFound module.
The next was mapping states to the modules. Previously, I defined two states (Success and Warning). Here, One or more specific modules have to belong to a specific state and the order.

In the case of Success, it included DS and Found, Found was followed by DS.
Third step, Make a unit monitor
Once the monitor type has successfully been made, It only remains to define unit monitor.
Go to Health monitor -> Monitors -> New.

It doesn't need to make a class in advance to create monitor ( There is example of creating a class for its monitor on the first reference site), just needed to define target.
I defined Microsoft.Linux.Computer as target and System.Health.AvailabilityState as parent monitor.
Then, clicked "Browser for a type" in Configuration tab and chose the monitor type that I defined earlier.

The last, defined recovery tasks in diagnostic and recovery tab.

I created three tasks when health status appear warning.
As knowing easily the meaning from their names, these are about making directory (/MGR), copying file and give privilege to the file.
After upload this MP to SCOM console, I removed folder for the purpose of test on a Linux Machine. The waning was produced well as the below picture and recovery tasks as well.
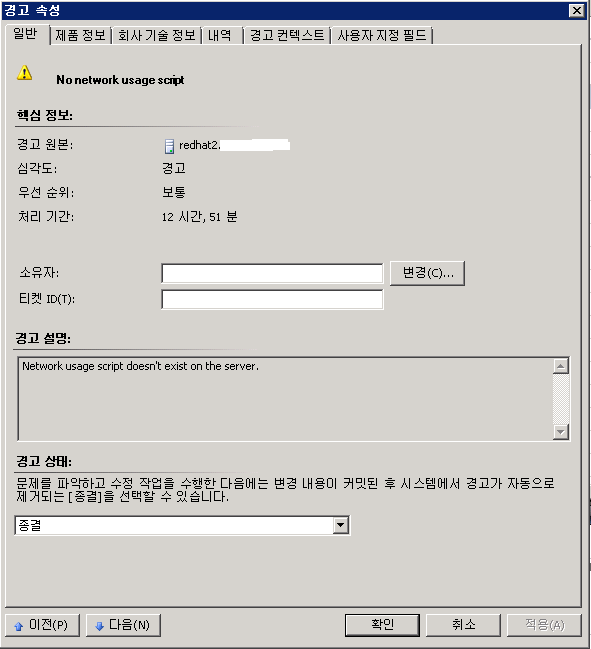
----------------------------------------------------------------
Changed the recovery setting, updated on 01 of June
Changed the recovery setting, updated on 01 of June
In addition to this, I created three recovery tasks at first as you can see the above picture, and got an issue to address. This monitor didn't guarantee the order of these tasks. In order words, I intended to start from MakeDir to FilePrevilege, but there were not started as this order.
So, I tried to create a Write action this time.
Go Type library-> Module types -> Write actions.
The advantage of using this, I was able to make them in good order: I can set next module.

When I added to recovery, It was appeared from the list.

This was the final version of my unit monitor. The different from the previous was that the number of tasks decreased to only one.

----------------------------------------------------------------
About File transfer, updated on 03 of June
This is information of my write action called SFTP.

Let's only focus on file transfer among three steps (Invoke, SFTP and Invoke2).
After you add a write action named Microsoft.Unix.SFTPTransfer.WriteAction, you need to fill its properties of Host, UserName, Password, SourceFile, TargetFile. The point is that the file is transfered from Windows to Linux via SFTP.
I think that values of Host, Username and password are the the same with the above image.
- Host: $Target/Property[Type="Unix!Microsoft.Unix.Computer"]/PrincipalName$
- UserName: $RunAs[Name="Unix!Microsoft.Unix.ActionAccount"]/UserName$
- Password: $RunAs[Name="Unix!Microsoft.Unix.ActionAccount"]/Password$
However, Sourcefile and Targetfile may be difference with your cases.
SourceFile should be a file located in SCOM management server.
In my case, I created a folder named LinuxScripts on C: drive on SCOM management server and then I located my file(network_usage.py) into the folder. And the last property, TargetFile is the linux directory which you want to copy to.
-----------------------------------------------------------------------------------------------------------
1. This is second to none site, this is good guide about authoring MP: http://operatingquadrant.com/2011/03/23/operations-manager-extending-unixlinux-monitoring-with-mp-authoring-part-i/
2. The contents of this site includes lots of XML tags, but it gives you analytical way of which part of your MP is wrong when the monitor doesn't work: http://technet.microsoft.com/en-us/library/dd789006.aspx
2011년 5월 18일 수요일
Microsoft announced to support CentOS
Great news!!
Microsoft will support Windows Server2008 R2 Hyper-V to run CentOS, had only publicy supported Suse and Redhat.
In the case of Hyper-V, there no additional software, integration service for example. However, it includes technical support.
You can read detail from here :
http://blogs.technet.com/b/openness/archive/2011/05/15/expanding-interoperability-to-community-linux.aspx
Microsoft will support Windows Server2008 R2 Hyper-V to run CentOS, had only publicy supported Suse and Redhat.
In the case of Hyper-V, there no additional software, integration service for example. However, it includes technical support.
You can read detail from here :
http://blogs.technet.com/b/openness/archive/2011/05/15/expanding-interoperability-to-community-linux.aspx
2011년 3월 18일 금요일
SCOM Cross platform monitoring for Linux
This procedure is to describe the steps for monitoring Linux system From Operation Manager 2007 R2. Some items which you want to monitor may not show up in the OM console.
We had inquiries about this with Microsoft. they gave an advice that we should build our own MP(Management Pack).
1. Install MPs
download & install SCOM Cross Plaform ManagementPack
2. Install Cumulative Update
- CU 3 (KB 2551525)
- CU 4 (KB 2449679)
3. SCOM started data collection for linux five hours later after step 2,
According to Microsoft, Linux discovery can take long time (up to 1 day)
4. We can get performance data from SCOM database. but, some data doesn't provide from SCOM Cross Platform management pack.
Here, we couldn't get network usage(%) information.
In this case, we should make user-defined MP and apply to SCOM conole.
We had inquiries about this with Microsoft. they gave an advice that we should build our own MP(Management Pack).
1. Install MPs
download & install SCOM Cross Plaform ManagementPack
2. Install Cumulative Update
- CU 3 (KB 2551525)
- CU 4 (KB 2449679)
3. SCOM started data collection for linux five hours later after step 2,
According to Microsoft, Linux discovery can take long time (up to 1 day)
4. We can get performance data from SCOM database. but, some data doesn't provide from SCOM Cross Platform management pack.
Here, we couldn't get network usage(%) information.
In this case, we should make user-defined MP and apply to SCOM conole.
2010년 1월 11일 월요일
Supported Guest OS on Hyper-V
This lists the guest operating systems that are supported on Hyper-V.
The numbers in parentheses refer to the number of virtual processors that should be configured to a virtual machine.
Windows 2000 (one)
Windows 2000 Server SP4
Windows 2000 Advanced Server SP4
Windows Server 2003 x86 / R2 x86 (one, two)
Web (SP2), Standard SP2, Enterprise SP2, Datacenter SP2
Windows Server 2003 x64 / R2 x64 (one, two)
Web (SP2), Standard SP2, Enterprise SP2, Datacenter SP2
Windows Server 2008 x86, x64 (one, two and four)
Standard, Enterprise, Datacenter, Web, HPC
Standard without Hyper-V, Enterprise without Hyper-V, Datacenter without Hyper-V
Windows Server 2008 R2 x86 / x64 (one, two and four)
Standard, Enterprise, Datacenter, Web Server
Windows XP Professional x86
XP Professional SP2 (one)
XP Professional SP3 (one, two)
Windows XP Professional x64 SP2 (one, two)
Windows Vista x86 / x64 (one, two)
Business SP1, Enterprise SP1, Ultimate SP1
Windows 7 x86, x64 (one, two and four)
Business, Enterprise, Ultimate
Red Hat Enterprise Linux 5.2, 5.3 x86 (one)
Red Hat Enterprise Linux 5.2, 5.3 x64 (one)
Suse Linux Enterprise Server x86 / x64 (one)
Suse Linux Enterprise Server 10 SP1 or SP2
http://www.microsoft.com/windowsserver2008/en/us/hyperv-supported-guest-os.aspx
Link about a post that Hyper-V support Redhat as guest OS.
http://blogs.technet.com/virtualization/archive/2009/02/15/Microsoft-and-Red-Hat-Joint-Technical-Support.aspx
피드 구독하기:
글 (Atom)